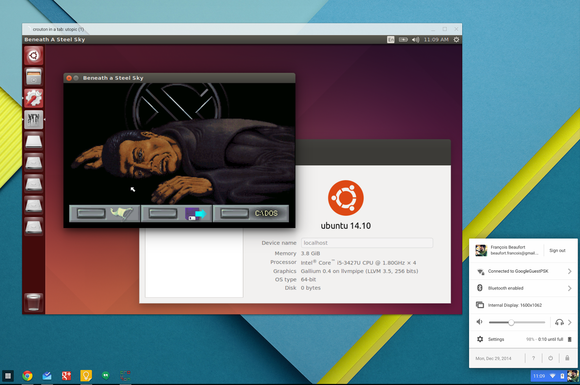
I really love using Crouton on my Chromebook Pixel LS 2015. I was sad to see that there is no cinnamon desktop environment target with the latest versions of crouton. Below is what I did to get Cinnamon on my chromebook. Much of what I did was taken fromhttps://gist.github.com/sohjsolwin/5939948

  1. Create a base chroot
  2. Enter your chroot
sudo apt-get update
sudo apt-get install software-properties-common python-software-properties
sudo add-apt-repository ppa:tsvetko.tsvetkov/cinnamon
sudo apt-get update
sudo apt-get install cinnamon

Once Cinnamon was installed I needed to know how to start it manually. Thanks to the Arch Linux forums for explaining it. You have to create a .xinitrc file in your home directory within your chroot.

echo "exec cinnamon-session" > ~/.xinitrc

Trying to manually start cinnamon by typing startx didn’t work – I got a blank screen and had to hard reset to get anything to come back. Thanks to github I learned you need to use xinit instead of startx.

Lastly, we need to create a suitable startcinnamon script.

wget https://gist.github.com/sohjsolwin/5934362/raw/f68fc0942798902a0bd48f40c17dc0cd5cf585ea/startcinnamon

Modify the file to remove the startx command with xinit. Also remove everything after xinit. My file is as follows:

APPLICATION="${0##*/}"

USAGE="$APPLICATION [options]

Wraps enter-chroot to start a Mint session.
By default, it will log into the primary user on the first chroot found.

Options are directly passed to enter-chroot; run enter-chroot to list them."

exec sh -e "`dirname "$0"`/enter-chroot" "$@" xinit

Make this file executable (chmod +x startcinnamon) and move it to the /usr/local/bin directory of your chromebook (not your chroot.) Now all you need to do is enter

sudo startcinnamon

and your cinnamon desktop should come up!


Update 2016-01-04

These two scripts seem to work a little bit better. Place this one within your chroot under /usr/local/bin/startcinnamon:

#!/bin/sh -e
# Copyright (c) 2015 The crouton Authors. All rights reserved.
# Use of this source code is governed by a BSD-style license that can be
# found in the LICENSE file.

# Launches GNOME; automatically falls back to gnome-panel

exec crouton-noroot gnome-session-wrapper cinnamon

Place this one in /usr/local/bin outside your chroot (on your chromebook itself.)

#!/bin/sh -e
# Copyright (c) 2015 The crouton Authors. All rights reserved.
# Use of this source code is governed by a BSD-style license that can be
# found in the LICENSE file.

set -e

APPLICATION="${0##*/}"

USAGE="$APPLICATION [options]

Wraps enter-chroot to start a GNOME session.
By default, it will log into the primary user on the first chroot found.

Options are directly passed to enter-chroot; run enter-chroot to list them."

exec sh -e "`dirname "\`readlink -f "$0"\`"`/enter-chroot" -t cinnamon "$@" "" \
    exec startcinnamon

https://techblog.jeppson.org/2015/07/install-ubuntu-chroot-on-your-chromebook/

I recently got a Chromebook Pixel 2015 LS. It is a very nice device. Chromium OS is great but a power user like myself wants a little more functionality out of this beautiful machine.

Fortunately it’s not too difficult to get an Ubuntu chroot running side by side with chromium. The Google developers have made a script to automate the process.

Below is my experience installing an Ubuntu Trusty chroot on my chromebook 2015 LS.

Prepwork

  • Enter developer mode:
    Press ESC, Refresh, power simultaneously (when the chromebook is on)

    • Every time you power on the chromebook from now on you’ll get a scary screen. Press CTRL-D to bypass it (or wait 30 seconds)
    • If you hit space on this screen instead of CTRL+D it will powerwash (nuke) your data
      A scary screen will pop up saying the OS is missing or damaged. Press CTRL D, then press Enter when the OS verification screen comes up.
  • Wait several minutes for developer mode to be installed. Note it will wipe your device to do this.

Install Crouton

Now that we’re in developer mode we will use a script called crouton to install an Ubuntu chroot (thanks to lifehacker for the guidance.)

  1. Download Crouton:  https://github.com/dnschneid/crouton
  2. Press CTRL ALT T to open terminal
  3. Type ‘shell’ (without quotes) and hit enter
  4. sudo sh ~/Downloads/crouton -r trusty -t touch,extension,unity-desktop,keyboard,cli-extra -e -n unity
    1. Note the arguments are suited to my needs. You will want to read up on the documentation to decide which options you want, i.e. desktop environment
  5. Install this crouton extension to integrate clipboard (in conjuction with the ‘extension’ parameter above)

General points of interest / lessons learned

  • Don’t enter the chroot and type startx. It will hard freeze your chromebook.
  • You don’t need to blow your chroot away if you want a different desktop environment, simply install desired environment on your existing chroot
  • To switch between chroots pres Ctrl + Alt + Shift + F2 or F3 (back or forward arrows on top row, not to be confused with the arrows on the bottom right of the keyboard)

High DPI

High DPI screens are a pain to deal with. Here are my tweaks:

  • Go to System settings / Displays / Scale for menu and title bars. I like 1.75
  • Alternatively you can change your resolution. If you mess up and X won’t start properly, delete ~/.config/monitors.xml (thanks toaskubuntu)
  • Use the setres script to enable other resolutions in the display manager
    • setres 1440 960
  • Firefox fix tiny text:
    • go to about:config and modify layout.css.devPixelsPerPx, set to 2

Other tweaks:

  • Make trackpad match Chrome:
    • System settings / mouse and trackpad / Check “Natural Scrolling”
  • Remove lens suggestions:
    • Install unity-tweak-tool, notify-osd, overlay-scrollbar, unity-webapps-service
    • Run unity-tweak-tool and uncheck “search online sources” from the search tab
  • Move docky bar to the left:
    • sudo apt-get install gconf-editor
    • Press Alt+F2, enter: gconf-editor and in this configuration editor, navigate to “apps -> docky-2 -> Docky -> Interface -> DockPreferences -> Dock1″
    • On the right side there are some properties with their corresponding values, including the position of the dock which you can change from “Bottom” to “Top/Left/Right” to move Docky to the upper part of the desktop.
  • Install Mac OSX theme
  • Install elementary OS chroot

Garbled mouse cursor when switching between chroots

Sometimes the mouse cursor would get all weird when switching between my chroots. The fix is to install the latest Intel drivers within your chroot.

sudo apt-get install software-properties-common python-software-properties
sudo add-apt-repository https://download.01.org/gfx/ubuntu/14.04/main
wget --no-check-certificate https://download.01.org/gfx/RPM-GPG-KEY-ilg -O - | sudo apt-key add -
wget --no-check-certificate https://download.01.org/gfx/RPM-GPG-KEY-ilg-2 -O - | sudo apt-key add -
sudo apt-get update
sudo apt-get upgrade

That’s it.. for now 🙂


Update 07/27/2015

I discovered that creating chroots was taking a very long time due to the mirror being chosen. I discovered the -m parameter of crouton which allows you to specify a mirror of your choosing. My updated setting is thus:

sudo sh ~/Downloads/crouton -r trusty -t touch,extension,kde-desktop,keyboard,cli-extra -e -n unitykde -m http://mirrors.xmission.com/ubuntu

If you happened to do a CTRL + C to cancel an existing chroot install that was going slowly, you can simply append the -m parameter above along with -u -u to resume with the updated mirror:

sudo sh ~/Downloads/crouton -r trusty -t touch,extension,kde-desktop,keyboard,cli-extra -e -n unitykde -m http://mirrors.xmission.com/ubuntu -u -u


The now-familiar knock seemingly started when the very first Googley laptop rolled off the line. “Sure, Chromebooks are nice, but they can’t run Photoshop.”

Well, that just isn’t true anymore. Nor are many other Chromebook myths.

From Photoshop to Office and beyond, here are five powerful things you might be surprised to learn you can do with a Chromebook.

1. Edit images with Adobe Photoshop

Adobe and Google recently announced they’d be making Photoshop available as a streaming Chrome app. This means Photoshop will work on Chrome OS, and even in Chrome on desktop Linux! To do this, the Windows version of Chrome will run on Adobe’s servers and be streamed to your Chrome web browser.

chromebookphotoshop

Google

Photoshop on a Chromebook

It sounds unnecessarily complicated (and means an Internet connection is vital), but Photoshop is actually such a demanding application that this could be useful. When you use demanding functions, they can be sped up because they’re running on Adobe’s servers—they won’t drain your laptop’s battery faster or send modest Chromebook processors screaming. Photoshop will be integrated with Google Drive, so you can easily keep track of your files.

Currently, this feature is in beta and available only to “select North America based Adobe education customers with a paid Creative Cloud membership.” But it should eventually come to all Creative Cloud subscribers.

2. Use Microsoft Office

Microsoft likes to trumpet how Chromebooks don’t have the full desktop version of Microsoft Office, and that’s true. But unless you’re an accountant, you probably don’t need all those fancy features.

Microsoft offers a completely free web-based version of Office called Office Online, complete with Word Online, Excel Online, and PowerPoint Online. Microsoft even makes these apps available in the Chrome Web Store. These web apps aren’t just for Chromebook users, though. Windows users could use Office Online to get an official Microsoft Office experience for free, and they let desktop Linux users use an official version of Microsoft Office without hacking around in Wine, too.

2 word web app on chrome os

The Word Online web app in Chrome OS.

If you tried Microsoft’s “Office Web Apps” in the past and weren’t crazy about them, give them another try. Reborn as Office Online they’ve been much improved.

Compared to Google Docs, Office Online doesn’t offer any offline support, which is a bit of a bummer. But it does provide a familiar interface and more-or-less guaranteed compatibility with Microsoft Office documents. It saves those Office documents to OneDrive, where you can access them using Office apps on any other device—even the full desktop version of Office on your Windows or Mac.

3. Run (almost) any Android app

Google is working toward allowing all Android apps to run on Chrome OS. They recently released just four Android apps for Chrome, but enterprising hackers (the good kind) have found ways to make (almost) any Android app run on a Chromebook. Yes, this means you can now use Skype on a Chromebook.

4.3 skype on chrome os

The Skype Android app running in a Chromebook, complete with system notifications enabled.

This is becoming easier all the time. You can now use the ARChon Package app on Android to quickly convert an Android app to run on Chrome, or install the twerk Chrome app to quickly package an APK file for installation in Chrome.

This feature is very likely to keep improving, so apps that don’t work perfectly now should eventually work better. When Google is done, Chromebooks will be able to access a whole new universe of software without any hacks whatsoever.

4. Work offline

Yes, you can work offline on a Chromebook. Read your Gmail and compose new messages? Sure. View your Google Calendar? No problem. Edit documents in Google Drive? You got it.

4 offline apps on chrome os

Setting up some of Chrome OS’s offline capabilities.

Beyond the basics, you can download Kindle eBooks, videos, music, and PDFs to view offline. Use a Chrome app like Google Keep to compose notes or manage your to-do list with an app like Wunderlist or Any.DO. You can even purchase TV shows and movies from Google Play Movies & TV and download them to watch them offline, too. If you just want to kill some time, you can also install games that run offline.

Sure, many things on a Chromebook can only be done online, but let’s stop pretending that’s unique to Chromebooks. It’s 2014, and even a Windows or Linux laptop feels practically unusable when there’s no Internet connection available.

And, in Chrome 39—which is still working its way through development versions, so you probably won’t have this feature yet—you’ll be able to play an endless running game whenever you see an “Unable to connect to the Internet” page.

5. Use a full desktop operating system

This last feature isn’t for the novice users that just buy Chromebooks for their simplicity. But this is World Beyond Windows, where I tout the benefits of Linux, so I can’t leave it out.

Flip the developer mode switch (it’s in software now, but it used to be a hardware switch) and you can get full access to your Chromebook’s internals. You can install a full desktop Linux system (like Ubuntu) alongside your Chrome OS system. Flip over to the Linux system when you want to do some work with traditional desktop apps and powerful terminal commands.

5 steam for linux on ubuntu

Steam for Linux running in Ubuntu running on a Chromebook. Softwareception!

Or, even better, install Steam for Linux and play games—as long as you have an Intel-based Chromebook and not an ARM one, that is. Or, with Steam in-home streaming, you could run those games on your gaming PC and stream them to a Chromebook running Steam for Linux.

You could also install other Linux applications like Minecraft and Skype for Linux, both of which are now Microsoft applications. Yup, Microsoft makes Skype (and now Minecraft) for desktop Linux, but not Chrome OS. MakeUseOf has a great primer on installing Linux on a Chromebook if you’re curious.

The list of things a Chromebook can’t do is shrinking rapidly. Recent advancements like Chrome apps, Android apps on Chromebooks, and Photoshop for Chrome OS show Google is serious about evolving the platform. It can all seem a bit messy—shouldn’t developers be making Chrome apps and not Android apps?—but it’s undeniably making Chromebooks more powerful and capable.

I have written this guide to help new Chromebook users to get up and running with their new device, it may also provide some tips for you Chromebook veterans. This guide will apply to all Chromebooks, from the now retired Cr-48 to Samsung’s and Acer’s latest offerings.

Signing In, Updating Chromebook

When you first turn on your new Chromebook, it will require to first connect to the Internet. WiFi will be the preferred choice, but your Chromebook may have a Ethernet connection.

Once you are connected to the Internet, Chrome OS will start to look for the latest updates for your Chromebook. This is your first experience of why Chrome OS is excellent; automatic updates, bringing new features and improvements to your Chromebook every 6 weeks. If there is an update to download, the process will take around 10-15 minutes to complete.

Once updated, you will be next required to sign in with your Google account. This is the same account used for Gmail or you may have used it to enable Chrome sync on your computer. Once signed in, you will be required to select a profile picture; you can select your Google Account profile picture, or choose a Chrome OS profile picture or take a new picture of yourself using the built in web camera.

Thats it! You are all setup and ready to go. Chrome OS will take a few seconds to do the final setup. This is where Chrome OS really shines. If you currently use Google Chrome on your computer with Chrome Sync enabled, Chrome OS will now be downloading your Bookmarks, Extensions, History, Passwords and Web Apps from the cloud and applying them to your Chromebook.

Basically, you will be up and running within a few minutes, and you can start using your Chromebook without any other setup.

Learning the keys

Chrome OS itself uses similar keyboard commands as Google Chrome on your computer, however built into the OS itself, there is a handy keyboard commands reference, which lists all the available key commands.

Ctrl + Alt + ?

Chromebooks also has a different keyboard to what you may have seen on other laptops. For starters, there is no Caps Lock key. This has been replaced with a dedicated Search key which will launch the App Menu. The App Menu is a place where all your Web Apps are located, you can perform searches here; and soon it will be used to search Google Contacts. If you would rather have the Caps Lock key back, you can either use Alt + Search key which will act as the Caps Lock key; or to enable it permanently, you can change the Search key to the Caps Lock key under “Settings”. (chrome://chrome/settings/keyboard-overlay)

The Home, End, Page Up, Page Down and Delete keys are also missing, again there is a keyboard command to regain this function.

Ctrl + Alt + Up Arrow key – Home
Ctrl + Alt + Down Arrow key – End

Alt + Up Arrow key – Page Up
Alt + Down Arrow key – Page Down

Alt + Backspace  –  Delete the next letter (forward delete)
Ctrl + Backspace   – Delete the previous word

Finally, the Chromebook keyboard has replaced the function keys (F1, F2, F3, etc) with browser buttons.

Some of these browser buttons have secondary commands;

F4 + Shift – Full Screens the active window
Esc + Shift – Open Task Manager

Alt + F6 – Keyboard Brightness down
Alt + F7– Keyboard Brightness up

Ctrl + F4 – Mirror Monitor
Ctrl + F5 – Take Screenshot

Finally, the Power button has two modes. A short press will Lock the Chromebook, a large press will shut down the Chromebook.

Personalising

Like many desktop operating systems, there are plenty of customisation options. To change the desktop wallpaper, you can either right click on the desktop and select “Set Wallpaper” or access the option from Settings. You can select wallpapers which come part of Chrome OS, or select your own wallpaper.

Chrome OS has a “dock” for launch apps from and managing open windows. To add an app to the dock, open the “App Draw” and right click on the web app, select “Pin to Launcher”. Web Apps can also be managed to open in a certain way; either as a full screen app, a pin tab or its own dedicate windows. These options can also be selected by right clicking on the Web App.

Add New Users

Adding a new user on to your Chromebook is very simple. From the login page, select the “Add User” option and enter their Google account details. Like, with the initial setup, this user’s Chome sync data will be downloaded to the Chromebook. Each user account will have their own Download folder, personalisations and Chrome sync data. Each account is secured by their Google account password.

Guest Mode is available on Chromebooks, allowing friends and family to use your Chromebook without being able to access your data. Gust Mode works like Incognito mode, so their data is wiped once they log out of guest mode.

Under Settings (chrome://chrome/settings/accounts), user accounts and guest mode can be managed here.

Chrome Web Store

Like Google Chrome on your computer, you have access to the Chrome Web Store on your Chromebook. The web store is a place where you can download themes, extensions and web apps for your Chromebook. Themes add an extra layer of customizability, by theming your browser window. Extensions add extra functionality to Chrome, including some of the most essential features such as Adblock and Google Talk. Web Apps provide links to your favourite web applications like Gmail, Calendar and Google Drive; plus some Web Apps include offline support using HTML5.

Most web apps, extensions and themes are free to download, and will update automatically.

Switching Channels

Like Google Chrome, Chrome OS has different update channels users can be part of. Default is the Stable channel, in which stable version of Chrome OS will be available to download. While Beta and Development channels are still under testing and are not regarded as stable. You will receive the latest features using the Dev channel, but there will likely be issues. Beta channel will also receive new features before stable release, while still not regarded as stable, it is more stable than the Dev channel.

It is recommended that users stay on the Stable channel, however, if you are feeling quite adventurous, you can switch update channels. Click the Chrome menu on the browser toolbar and select “Settings”. Click Help on the “Chrome OS” page that appears, and select the channel you would like to use.

Going Offline

While many see Chromebooks as a device you can only use with an active Internet connection, Google has provided offline functionality. Images, audio and video stored locally can be viewed while offline with the built in media player. PDF files and office documents stored locally can be viewed while offline. With Chrome OS’s built in support for Google Drive, files can be enabled to be stored locally to be viewed offline.

Many web apps from the Chrome Web Store can be used offline. Most notably, Gmail Offline, Google Calendar has offline support, Google Drive can be setup to allow for editing and viewing of docs and sheets offline, and you can play Angry Birds offline.

Minor Notes

  • If you are feeling quite adventurous, try out Chrome Flags (chrome://flags) which is where you can enable new features which are currently in development; such as Smooth Scrolling, GPU rendering, Memory Monitor in taskbar, Google Contacts integration and much more.
  • If you are having technical issues with your Chromebook, you are giving it to a friend or your selling your Chromebook; make sure you ‘Reset’ the device which will wipe your account and all your data from the Chromebook. Restoring to factory settings. This can be found in “Advanced Settings” (chrome://chrome/settings/factoryResetData)
  • A common misconception with Chromebooks is the ability to run Linux applications. While, Chrome OS uses the Linux kernel and has basic access to a Terminal (Ctrl + Alt + T), it can not run Linux applications.
  • Chrome OS supports a variety of USB devices, from flash drives and portable hard drives, to wireless mice and keyboards. You will be surprised by the extensive hardware support!
  • Chromebooks support multi-touch trackpads; two-finger scrolling and two-finger tab for right click menus are enabled by default.

Finally, this video produced by the Chrome team, may help you navigate your Chromebook. Please note, some of the UI has changed since the making of this video.

Here are the tricks that ultimately fixed my Chromebook’s speed and made it like new again. Try them for yourself.

Each step of this guide is important to understanding what is causing your trouble, though I’ve left the ultimate trick to speed up your Chromebook until last.

Viewing RAM Usage on Chromebooks

To view your Chromebook’s memory usage, click the Menu button (the three lines in the top-right of Chrome), then choose More Tools, and Task manager. You can also use Shift +Esc if you prefer keyboard shortcuts. The more extensions you have running, the more memory your browser needs and you may find your browser experience agonizingly slow. But, how do you pinpoint extensions that are using up the most memory? Read More

Task Manager Chrome

If you want even more information, click on the “Stats for Nerds” link in the bottom-left of this window. Alternatively, head here: chrome://memory-redirect/

Analysing Your RAM Usage: What to Stop

This process above will show you all of the extensions and tabs that are taking up the most memory on your Chromebook. This will seriously make you re-think leaving lots of tabs open and running a pile of extensions.

Extensity

You may also find you need to log out other users as they’ve left tabs and extensions running.

If in this analysis you see “Background Page: Google Drive” is hogging most of your resources, skip ahead to the last tip in this article.

Disable Some Settings

For many users, they find Chrome is trying to hard to be helpful and that’s slowing things down. Try going to Menu > Settings > Advanced Settings > Privacy and turning off the following two options:

  • “Pre-fetch resources to load pages more quickly”
  • “Use a web service to help resolve navigation errors”

Prefetch Resources

Restart Your Chromebook

Some extensions and process are just a little dodgy and will continue to use more and more memory over time. To combat this, an occasional reboot will work wonders. Come on, it only takes a few seconds!

Google Drive in Offline Mode Uses RAM

If you noticed a large amount of memory usage by “Background Page: Google Drive”, this tip is for you. You no doubt have a lot of documents in your Google Drive, and this is causing your Chromebook to slow down. That’s because Google is syncing your documents for your offline use. A user with very few Drive documents wouldn’t notice this as much.

To fix this, you need to visit your Google Drive Settings. Head to drive.google.com, click the gear in the top-right and de-select the option to “Sync Google Docs, Sheets, Slides & Drawings files to this computer so that you can edit offline”.

As you’d expect, you no longer have immediate access to edit all of your documents offline now. However, if you’re online most of the time anyway, as most people are these days, you won’t even care. And your Chromebook will be fast again!

Chromebooks have transitioned from an intriguing idea to a product that’s taking the computing world by storm. Quick boot times, long battery life, and connected apps make these budget-friendly laptops a great choice for a diverse set of needs.

If you’re a tinkerer and like to really squeeze efficiency from your machines, though, you can get a lot of mileage from installing Linux. It provides greater control over your system and an array of useful applications that aren’t available on ChromeOS yet.

Note that switching your Chromebook over to developer mode may void your software or hardware warranty, so make sure to check with your manufacturer’s details before getting started. Theoretically, a restored image will take your system back to a brand new state, but you never know what the manufacturer might see if you have to send it in for repairs.

Step 1: Back up your junk!

One of ChromeOS’ best features is that a lot of your data is saved on your Google Drive, rather than locally. It’s especially convenient for you right now, because step two is going to erase all of the local data on your Chromebook. If you have any files you don’t want to lose, back them up to the cloud, or to another computer, for the time being.

You’ll also want to be prepared with a recovery image in case something goes wrong. You can download software directly from Google that makes this process easy, and then all you need is a flash drive or SD card, depending on your Chromebook’s connectivity.

Step 2: Developers, developers, developers

Now that you backed up all of your data and are ready to wipe your system completely (don’t worry, it will automatically install ChromeOS) and start over, you can put the system into developer mode. There used to be a complicated series of hidden switches for this, but it’s now part of the firmware and it couldn’t be easier.

With the device on, hold down the Escape and Refresh keys, then press the power button. When your Chromebook turns back on, you’ll be in recovery mode, with the screen telling you to insert a recovery disc. You’ll come back here if something goes wrong, but for now hold CTRL and press the D key to bring up the OS verification menu.

Chromebook developer modeYou have two options here, the first being that you can hit space to wuss out, remove yourself from the menu, and pretend you never wanted Linux to begin with. The second option is to hit enter, which will delete all of the local data on your Chromebook and boot you into developer mode. After a few moments, it will let you know that you’re now in developer mode, and then reboot the system to a fresh install of ChromeOS. Fill out all of your information like normal, and continue until you’re looking at the ChromeOS desktop.

Step 3: Don’t eat this Crouton

Dealing with Linux kernels and shell scripts can be intimidating and messy if you aren’t familiar with Unix, but that’s okay because David Schneider, a hardware engineer at Google, has made it relatively painless. Through a bundle of scripts he calls Crouton (an acronym for ChRomium Os Universal chrooT envirONment…sort of) all you have to do is use one command with a few parameters to get Linux up and running. The Crouton GitHub page features a download link for the software, as well as detailed instructions, troubleshooting tips, and forums to discuss issues and tricks for making everything run smoothly.

Chromebook CroutonDownload the Crouton file, which should be automatically placed in your Downloads folder, exactly where we want it. If you want some added functionality, like a unified clipboard between ChromeOS and Linux, you can install the Crouton Chrome extension, but it isn’t necessary.

Step 4: Roll your sleeves up and pull on a root

You might not know it, but Chrome actually has a terminal of its own, called crosh (ChRome OS developer Shell), that gives you access to settings that aren’t normally available, and lets you control files and programs in much the same way you would a Linux shell.

The easiest way to access it is to simply hold CTRL and ALT, then press T, which will open a Chrome window or tab with some text and a place to enter commands. Once you have this window open, type in “shell” without quotation marks to enter the true UNIX command line, where we’ll access the core at the center of your Chromebook and ChromeOS.

Chromebook Linux ShellIt’s from this command line that we’ll run Crouton, the program that will download and install any of a number of Linux distributions. For this guide we chose XFCE because it’s lightweight and functional, which is perfect for preserving the long battery life and portability of a Chromebook.

Step 5: Where’d my icons go?

Paste the following command into your command line. If you also installed the Chrome extension, change the command so it says xfce,extension at the end.

sudo sh ~/Downloads/crouton -t xfce

Running Crouton on Chromebook to Install LinuxHit enter and wait for a while as the system begins pulling necessary information and setting up your chroot. Don’t be surprised if this takes a bit and displays lots of text on your command line. Don’t interfere with this process.

Step 6: Babysitting the process

If you’ve ever installed an operating system before, you know that it needs time to itself to unpack data and configure system files, but it needs your input from time to time. A Linux installation is no different, so you’ll have to respond to a few prompts during setup.

Successful Install of Linux on ChromebookIf you used the most basic installation option, it will just ask you for a username (lowercase letters, numbers, and dashes) and a password. Before you go and type in the same password as your Gmail account or the one you use for every site, it’s important to note that your whole system, not just the Linux half, is protected by that password, so if someone guesses it and gets into the Linux shell, they have the potential to access your Google account and its data. You should choose a strong password regardless. Type it in again to verify (in Unix the cursor doesn’t move when you enter a password) and hit enter to finish installation.

Step 7: It’s in the computer

Your secondary operating system is now installed! To access it, simply return to the shell–where it should have deposited you after install–and enter the following command.

sudo enter-chroot startxfce4

Chromebook ChrootThe screen will go black for a minute and boot into the Linux desktop. If you aren’t familiar with the use of a Linux machine, it takes a bit more effort than Windows or Mac, especially the first time you boot it up.

Step 8: Live free

There are lots of advantages to installing Linux on your system, but there are a few that are particularly relevant to ChromeOS users. The following programs provide functionality that your Chromebook can handle but don’t fall within the ChromeOS ecosystem.

Steam: Valve’s insanely popular gaming store and community, is awesome for sitting on the couch, using your Chromebook to play whatever games in your library natively support Linux (I have just over 100 games in my library, and after installing, over 50 of them were available to play locally.) If you have a desktop somewhere in your house that you usually use to play games, you can play those games on your Chromebook too. Simply log into Steam with the same account on both your Chromebook and your desktop to set up the connection, rendering games and streaming the video output over your local network.

VLC: When it comes to media players it’s hard to beat VideoLAN Client, which supports dozens of audio and video formats, as well as a bevy of useful features for network streaming, playback, and disc formats. It couldn’t be easier to install (even coming packaged with some larger distributions) and is open source if you want to try your hand at compiling the software yourself.

Related: What is a Chromebook, anyway?

GIMP: Chromebooks don’t have a real version of Photoshop to run, with browser-based options such as Pixlr providing basic substitutes. If you need something a little more robust, the Gnu Image Manipulation Project (GIMP) is freely distributed image editing software that provides a large number of tools found in competing software, and a user base that can help solve problems and develop new tools and features.

Skype: Because Chromebooks are so easy to take with you wherever you go, Skype is a great choice for staying in touch. Most modern laptops have webcams and microphones built right in, too, so you can videochat from anywhere you have an Internet connection. If you can’t convince your friends to switch to Google Hangouts, at least you still have another option for managing your long-distance relationships and web friends.

Chromebooks are more powerful than you realize already, but zooming around the web in Google’s browser is just the beginning of what Chromebooks are capable of.

Chrome OS is built on top of the Linux kernel, and you can install a full Linux environment alongside Chrome OS on your Chromebook. This gives you access to Steam and over a thousand PC games, Minecraft, Skype, and everything else that runs on desktop Linux.

ARM vs Intel

If you do plan on getting a Chromebook and using Linux on it, you should consider whether it has an ARM chip or an Intel chip.

intel celeron

ARM-based Chromebooks can use a full Linux environment too, but they’re cut off from a whole ecosystem of closed-source software designed for traditional x86-based PC chips—including Steam and all its games. If you’re planning on running desktop Linux, get an Intel-based Chromebook. You could even use Steam’s in-home streaming to stream games running on a gaming PC to a Chromebook. But this isn’t possible an on ARM Chromebook, as Steam only runs on Intel CPUs.

Developer mode

Installing Linux isn’t officially supported by Google. It requires putting your Chromebook into “developer mode,” which gives you full write access to the entire operating system. Outside of developer mode, these files are normally protected to preserve the operating system’s security from attack. So you’ll have to enter developer mode before you can start installing Linux—check the official wiki for instructions, which are device-specific.

This will boot you into recovery mode, where you can “turn off OS verification.” After that, you’ll be able to have full access to the entire operating system—though that freedom entails some minor headaches. You’ll have to press Ctrl+D or wait 30 seconds every time you boot. Your Chromebook will beep at you and bug you, providing a scary warning that the normal verification process has been disabled. This ensures it’s always obvious when a Chromebook is in developer mode.

Want to stay up to date on Linux, BSD, Chrome OS, and the rest of the World Beyond Windows? Bookmark the World Beyond Windows column page or follow our RSS feed.

Installing Linux

There are several ways to install Linux. For example, you could install it to an SD card and boot from there.

But the best way to install Linux is to install it alongside Chrome OS on your hard drive, despite the limited storage capabilities in most Chromebooks. This lets you run both Chrome OS and a traditional Linux desktop or terminal at the same time, switching between them with a quick keystroke. You can also bring that Linux desktop straight onto your Chrome OS desktop. This also means that Linux environment can use all the same hardware drivers provided with Chrome OS, ensuring good hardware support.

I recommend using Crouton for this. It will help you install Ubuntu or Debian alongside Chrome OS. While this isn’t officially supported by Google, it is developed by a Google employee in his spare time. After you enable developer mode, you’ll be able to open the integrated Chrome OS shell, download the installation script, and run it. It’ll install and set up the Linux environment. The Crouton webpage provides instructions on installing it.

Using your Linux environment

With Linux installed via Crouton, you can run a certain command to launch the Linux session and then switch back and forth between the Linux environment and Chrome OS desktop with Ctrl+Alt+Shift-Back and Ctrl+Alt+Shift-Forward. Again, check Crouton’s webpage for more instructions.

ubuntu crouton chromebook

François Beaufort

Linux running in a Chrome OS window courtesy of the Crouton integration extension.

But rather than constantly switching back and forth, you’ll probably want to install the Crouton integration extension from the Chrome Web Store. This will give you a full Linux desktop in a window on your Chrome OS desktop so you can see everything at once without having to switch back and forth.

If you decide you’re done with Linux, you can simply disable developer mode and go back to the normal Chrome OS system state. You’ll be prompted to do this every time you boot your Chromebook. Doing this will erase everything on your Chromebook and set the operating system back to its clean, default state.

I just wanted to post a quick impressions of the Lenovo N22, there wasn’t really any proper reviews out there when I searched for them. I picked this up from amazon.co.uk for ~ 120€ – which is much cheaper than any other Chromebook available where I live (it’s more expensive now). For example the Acer Chromebook 14 would cost me 370€ – 400€

Specs – N3060 Celeron, 2GB ram and 32 GB eMC. I think there are 4gb models for sale as well, but not in amazon.co.uk. Some sites list this having n3050, but my model definitely has the n3060.

Body – This is a “education” type of device, so it’s bit more rugged than your standard Chromebook – drop resistant from 70cm and spill resistant as well. It’s quite light, 1.22 kg. I think it looks nice in the absolute low-end of laptops category 🙂

Display – Quite poor 1366×768 display to be honest, but still useable. It’s the same level as other cheap laptops. Brightness level is ok.

Ports – Two USB 3, HDMI, headphone jack, SD Card slot (where the SD card unfortunately sticks out)

Keyboard and trackpad – I was pleasantly surprised of these, I’ve used much more expensive laptops with worse trackpads and keyboards. Trackpad especially is very good for the price level, better than in my >1000€ gaming laptop bought couple of years ago.

Performance in ChromeOS – Seems ok for my use, ~5-7 tabs open on Chrome. 8480 Octane score. I’m comparing this to Thinkpad X240 with proper i3 and don’t see much difference. Plugging in a USB3 Hard drive seems to slow the system down, but there might be something wrong with the HD.

Crouton – I tried with Trusty and XFCE, seems to be working alright. Only immediate issue was trackpad which required a quick fix. Installed couple of applications Steam, Mendeley, Firefox, Torbrowser, VLC. Performance is good

One issue that I haven’t been able to solve: I seem to have tearing in Crouton VLC and SMPlayer, I’ve tried to turn off composition but that didn’t have any effect. VLC in ChromeOS side works without tearing, but is quite slow when scanning files.

All in all, I recommend this Chromebook if you want to try out ChromeOS cheaply, but people in US most likely have better options in <200 USD range. Performance and quality has been surprisingly good.

Any on else in the sub have this?

lenovo n22

Google’s Chromebooks have seen huge success in recent years, mainly on account of their affordability. While not as technically capable as a Windows laptop, you end up with heaps of value for money with almost every Chromebook device.

The Lenovo N22 is powered by an Intel Celeron N3060 processor clocked at 2.48GHz, and features an 11.6-inch HD anti-glare screen. Its battery life is an impressive 14 hours (claimed), and the laptop features a 180-degree rotatable webcam.

It weighs a lightweight 1.3kg, features 32GB of storage, 2GB of RAM, integrated Intel HD Graphics, and runs on Chrome OS, naturally.

Buy Now: Lenovo N22 11.6-inch Chromebook for £109 – save £50 at Amazon

What we said: We haven’t reviewed this particular model, but we did review last year’s very similar Lenovo N20 Chromebook. That scored 7/10, and was praised for its smooth, flexible hinge, the slick Chrome OS, and its good value for money. Here’s our verdict: It has its fair share of issues, but the N20 is still stonkingly good value for money.

What you said: The Lenovo N22 holds an impressive 4.6/5 score on Amazon, based on 68 user reviews. Comments include: “Really pleased with it so far” | “Light and easy to transport” | “ What a great bit of kit. Fantastic value for money|

How good a deal is this? Chromebook are almost always good value for money, and the Lenovo N22 is no different. At £99.99, you can’t really complain – this is perfect for those on a serious budget. You won’t be rendering 4K video and hitting up high-resolution, ultra-settings gaming, but if you need a machine to get some homework done on, and watch a bit of YouTube, this could be the perfect purchase for you.

Buy Now: Lenovo N22 11.6-inch Chromebook for £109 – save £50 at Amazon

Apple has a long relationship with Adobe. In fact, we met Adobe’s founders when they were in their proverbial garage. Apple was their first big customer, adopting their Postscript language for our new Laserwriter printer. Apple invested in Adobe and owned around 20% of the company for many years. The two companies worked closely together to pioneer desktop publishing and there were many good times. Since that golden era, the companies have grown apart. Apple went through its near death experience, and Adobe was drawn to the corporate market with their Acrobat products. Today the two companies still work together to serve their joint creative customers – Mac users buy around half of Adobe’s Creative Suite products – but beyond that there are few joint interests.

I wanted to jot down some of our thoughts on Adobe’s Flash products so that customers and critics may better understand why we do not allow Flash on iPhones, iPods and iPads. Adobe has characterized our decision as being primarily business driven – they say we want to protect our App Store – but in reality it is based on technology issues. Adobe claims that we are a closed system, and that Flash is open, but in fact the opposite is true. Let me explain.

First, there’s “Open”.

Adobe’s Flash products are 100% proprietary. They are only available from Adobe, and Adobe has sole authority as to their future enhancement, pricing, etc. While Adobe’s Flash products are widely available, this does not mean they are open, since they are controlled entirely by Adobe and available only from Adobe. By almost any definition, Flash is a closed system.

Apple has many proprietary products too. Though the operating system for the iPhone, iPod and iPad is proprietary, we strongly believe that all standards pertaining to the web should be open. Rather than use Flash, Apple has adopted HTML5, CSS and JavaScript – all open standards. Apple’s mobile devices all ship with high performance, low power implementations of these open standards. HTML5, the new web standard that has been adopted by Apple, Google and many others, lets web developers create advanced graphics, typography, animations and transitions without relying on third party browser plug-ins (like Flash). HTML5 is completely open and controlled by a standards committee, of which Apple is a member.

Apple even creates open standards for the web. For example, Apple began with a small open source project and created WebKit, a complete open-source HTML5 rendering engine that is the heart of the Safari web browser used in all our products. WebKit has been widely adopted. Google uses it for Android’s browser, Palm uses it, Nokia uses it, and RIM (Blackberry) has announced they will use it too. Almost every smartphone web browser other than Microsoft’s uses WebKit. By making its WebKit technology open, Apple has set the standard for mobile web browsers.

Second, there’s the “full web”.

Adobe has repeatedly said that Apple mobile devices cannot access “the full web” because 75% of video on the web is in Flash. What they don’t say is that almost all this video is also available in a more modern format, H.264, and viewable on iPhones, iPods and iPads. YouTube, with an estimated 40% of the web’s video, shines in an app bundled on all Apple mobile devices, with the iPad offering perhaps the best YouTube discovery and viewing experience ever. Add to this video from Vimeo, Netflix, Facebook, ABC, CBS, CNN, MSNBC, Fox News, ESPN, NPR, Time, The New York Times, The Wall Street Journal, Sports Illustrated, People, National Geographic, and many, many others. iPhone, iPod and iPad users aren’t missing much video.

Another Adobe claim is that Apple devices cannot play Flash games. This is true. Fortunately, there are over 50,000 games and entertainment titles on the App Store, and many of them are free. There are more games and entertainment titles available for iPhone, iPod and iPad than for any other platform in the world.

Third, there’s reliability, security and performance.

Symantec recently highlighted Flash for having one of the worst security records in 2009. We also know first hand that Flash is the number one reason Macs crash. We have been working with Adobe to fix these problems, but they have persisted for several years now. We don’t want to reduce the reliability and security of our iPhones, iPods and iPads by adding Flash.

In addition, Flash has not performed well on mobile devices. We have routinely asked Adobe to show us Flash performing well on a mobile device, any mobile device, for a few years now. We have never seen it. Adobe publicly said that Flash would ship on a smartphone in early 2009, then the second half of 2009, then the first half of 2010, and now they say the second half of 2010. We think it will eventually ship, but we’re glad we didn’t hold our breath. Who knows how it will perform?

Fourth, there’s battery life.

To achieve long battery life when playing video, mobile devices must decode the video in hardware; decoding it in software uses too much power. Many of the chips used in modern mobile devices contain a decoder called H.264 – an industry standard that is used in every Blu-ray DVD player and has been adopted by Apple, Google (YouTube), Vimeo, Netflix and many other companies.

Although Flash has recently added support for H.264, the video on almost all Flash websites currently requires an older generation decoder that is not implemented in mobile chips and must be run in software. The difference is striking: on an iPhone, for example, H.264 videos play for up to 10 hours, while videos decoded in software play for less than 5 hours before the battery is fully drained.

When websites re-encode their videos using H.264, they can offer them without using Flash at all. They play perfectly in browsers like Apple’s Safari and Google’s Chrome without any plugins whatsoever, and look great on iPhones, iPods and iPads.

Fifth, there’s Touch.

Flash was designed for PCs using mice, not for touch screens using fingers. For example, many Flash websites rely on “rollovers”, which pop up menus or other elements when the mouse arrow hovers over a specific spot. Apple’s revolutionary multi-touch interface doesn’t use a mouse, and there is no concept of a rollover. Most Flash websites will need to be rewritten to support touch-based devices. If developers need to rewrite their Flash websites, why not use modern technologies like HTML5, CSS and JavaScript?

Even if iPhones, iPods and iPads ran Flash, it would not solve the problem that most Flash websites need to be rewritten to support touch-based devices.

Sixth, the most important reason.

Besides the fact that Flash is closed and proprietary, has major technical drawbacks, and doesn’t support touch based devices, there is an even more important reason we do not allow Flash on iPhones, iPods and iPads. We have discussed the downsides of using Flash to play video and interactive content from websites, but Adobe also wants developers to adopt Flash to create apps that run on our mobile devices.

We know from painful experience that letting a third party layer of software come between the platform and the developer ultimately results in sub-standard apps and hinders the enhancement and progress of the platform. If developers grow dependent on third party development libraries and tools, they can only take advantage of platform enhancements if and when the third party chooses to adopt the new features. We cannot be at the mercy of a third party deciding if and when they will make our enhancements available to our developers.

This becomes even worse if the third party is supplying a cross platform development tool. The third party may not adopt enhancements from one platform unless they are available on all of their supported platforms. Hence developers only have access to the lowest common denominator set of features. Again, we cannot accept an outcome where developers are blocked from using our innovations and enhancements because they are not available on our competitor’s platforms.

Flash is a cross platform development tool. It is not Adobe’s goal to help developers write the best iPhone, iPod and iPad apps. It is their goal to help developers write cross platform apps. And Adobe has been painfully slow to adopt enhancements to Apple’s platforms. For example, although Mac OS X has been shipping for almost 10 years now, Adobe just adopted it fully (Cocoa) two weeks ago when they shipped CS5. Adobe was the last major third party developer to fully adopt Mac OS X.

Our motivation is simple – we want to provide the most advanced and innovative platform to our developers, and we want them to stand directly on the shoulders of this platform and create the best apps the world has ever seen. We want to continually enhance the platform so developers can create even more amazing, powerful, fun and useful applications. Everyone wins – we sell more devices because we have the best apps, developers reach a wider and wider audience and customer base, and users are continually delighted by the best and broadest selection of apps on any platform.

Conclusions.

Flash was created during the PC era – for PCs and mice. Flash is a successful business for Adobe, and we can understand why they want to push it beyond PCs. But the mobile era is about low power devices, touch interfaces and open web standards – all areas where Flash falls short.

The avalanche of media outlets offering their content for Apple’s mobile devices demonstrates that Flash is no longer necessary to watch video or consume any kind of web content. And the 250,000 apps on Apple’s App Store proves that Flash isn’t necessary for tens of thousands of developers to create graphically rich applications, including games.

New open standards created in the mobile era, such as HTML5, will win on mobile devices (and PCs too). Perhaps Adobe should focus more on creating great HTML5 tools for the future, and less on criticizing Apple for leaving the past behind.

Steve Jobs
April, 2010